We’ve recently noticed that there’s extra space within the Moodle Quiz in the releases of Moodle 4.5.5 & 5.0.1 these show on our customer versions as well as on the test Moodle, Mount Orange
Depending on theme you may have to change the above.
/* Remove the extra clearfix space on quiz pages, changed from block to inline */
#page-mod-quiz-attempt .clearfix:after, #page-mod-quiz-review .clearfix:after, #page-question-bank-previewquestion-preview .clearfix:after, #page-filter-embedquestion-showquestion .clearfix:after {
   display: inline;
}
That’s it.. If Moodle themselves get around to fixing this the above then might done something odd.. so if you spot that in the future, just remove the above.
You’ve noticed that a table is not returning data as efficiently as it should be. Then try this
ALTER TABLE <table_name> ENGINE = InnoDB;
This method uses the ALTER command to change the table engine to InnoDB, even if the table is already using InnoDB. While we have tested with InnoDB, it can also be applied to other storage engines.
Depending on how large this table is and whether it is on a Production site, it might / is best to first stop the site or to take it into Maintenance mode. We recently did this and it took 4 minutes to reindex a Moodle table with 8 million rows.
Afterward the process to load the page increase from 4.4 secs to first byte to 493 ms
Do you have a course within Moodle which now has so many participants that it has become impossible to maintain? You may have even got as far as attempting to use bulk unenrolment methods, only to find that the frontend of Moodle crashes when trying to delete too many users.
Using the following steps you can use Moodle internal systems to remove the ones which you no longer want to have access.
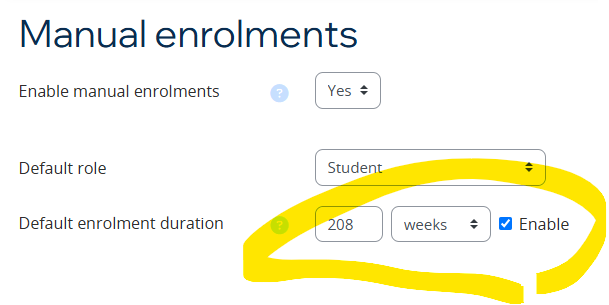
First off edit the enrolment method used to bring in these users, in our case that was via Manual enrolments
To do this you want to add a Default enrolment duration to this course visit siteroot/enrol/instances.php?id=xxxxxx, and add a number, the below 208 weeks is 4 years.
Now in the siteroot/global setting /admin/settings.php?section=enrolsettingsmanual for Manual enrolments you want to change this from the default of Keep user enrolled to Unenrol user from course
Now, you might be saying what could that do to my other courses !
Well further down this same settings page the following is also most likely to be set to 0, as that is Default
Meaning all your courses across your site with the enrolment method of Manual enrolments will have 0 set as the timeend value within enrolments.
To check what courses have manual enrolments with timeend not set to 0, run the following on the database
SELECT
    ue.id AS enrolment_id,
    u.username,
    u.firstname,
    u.lastname,
    c.shortname AS course_shortname,
    c.fullname AS course_name,
    u.lastaccess AS last_login_date,
    ue.timeend,
    FROM_UNIXTIME(ue.timeend) AS timeend_readable,
    FROM_UNIXTIME(ue.timestart) AS timestart_readable
FROM
    mdl_user_enrolments ue
JOIN
    mdl_enrol e ON ue.enrolid = e.id
JOIN
    mdl_course c ON e.courseid = c.id
JOIN
    mdl_user u ON ue.userid = u.id
WHERE
    e.enrol IN ('manual')
    AND ue.timeend != 0;
Now what you have to do is change the enrolments you want to get rid off, if over (in our case) 4 years to have a timeend of x and you can do this by using the enrolment timestart and adding on 4 years to timeend. Run the below SQL, first changing the e.courseid value to the course from above which you’ve set the Default enrolment duration on.
Make sure you test this on a UAT server first as well as backup your mdl_user_enrolments table
UPDATE
mdl_user_enrolments ue
JOIN mdl_enrol e ON ue.enrolid = e.id
SET ue.timeend = ue.timestart + (208 * 7 * 24 * 60 * 60)
WHERE e.courseid IN ('xxxxxx')
AND e.enrol IN ('manual')
AND ue.timeend = 0;
Once complete, watch the enrolments which are over 4 years magically disappear from your enrolment method.
Remove participants who have never engaged
If you want to remove the participants who have not engaged with the course then run the following SQL, first replacing 1732782442 and c.id, the unix time value can be found here, the one below is Thu Nov 28 2024 08:27:22 as long as the time is in the past to now then this will work.
The below SQL addresses the main 3 enrolments methods as you might want to work with more than just Manual.
 UPDATE
    mdl_user_enrolments ue
JOIN
    mdl_enrol e ON ue.enrolid = e.id
JOIN
    mdl_course c ON e.courseid = c.id
JOIN
    mdl_user u ON ue.userid = u.id
SET
    ue.timeend = '1732782442'
WHERE
    c.id IN ('xxxxxx')
    AND e.enrol IN ('manual','self','meta')
    AND u.lastaccess = 0;
All the best, if stuck – please leave a comment.
If you’d like more information or are having different problems which need solving, then why not have CoSector host your site for you.
Who we are
CoSector is the premier supplier of digital student experience solutions for the HE sector. We are the only provider created by a university for the benefit of universities. Check out the website above for more information.
The problem with most Christmas candle bridges (& some other light sets) is that they are one complete circuit.. Meaning if one bulb is dead the whole thing will not light.. I found this out when decorating our home this weekend. Check out this picture to see how to work out how many of your bulbs need replacing.
Grab a 9v battery, place the end of the bulb on the + (plus) and the side of the bulb touching the – (minus) and check that it lights. This trick will only light up bulbs which need less than about 4.5 watts to light.
Please do not throw away the whole item, thinking that it is broken !
If you are thinking of using this same method to check higher powered bulbs on a higher power battery DO NOT do it, it could be very shocking ⚡⚡⚡ for you.
Setting up OAuth 2 services within Moodle can be quite painful.
Hopefully the below information which is ‘not’ documented by Moodle will help you with that.
The issue I was seeing was when I clicked on ‘Connect to a system account’, it threw this error “The system account was not connected for offline access“
To fix this the answer lies within the endpoints on Moodle, the authorization_endpoint & token_endpoint needed the specific endpoints from the Azure App Registration
Within Azure these are here
Rather than the default ones which look like this, in the case for me /common/ was not working
If your issue is a different one and you are after support for your Moodle, why not reach out to us to host and or just support your instance.
Have you ever had the following error in one of your Moodle scheduled tasks or even when you’ve been upgrading Moodle & have noticed it in the MySQL logs ??
What this means is that and the size of the file it is trying to write is bigger than the variable currently allows, MySQL has tried to do as you’ve asked and couldn’t at which point it has packed its bags and goes home..
You might see it if you ever run a full Sync users with Entra AD on a large scale Moodle site.
The task will then just restart and fail the next time as well and keep looping causing your sync and Moodle site get more and more out of date with your Azure AD.
How to fix.. its pretty simple really, you just need to get MySQL’s connection to be able to write larger sized data files packages.
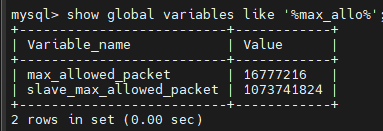
The default for max_allowed_packets on your Moodle’s MySQL database is likely to be 16mb
show global variables like '%max_allow%';
You want to change this to at least 256mb’s
You do this with the following line on your MySQL command line
set global max_allowed_packet = 268435456;
What is 268435456 ??
268435456 / 1024 / 1024 = 256 as in 256mbs, just like that 16777216 / 1024 / 1024 = 16 as in 16mbs.
This ‘should’ be enough to be able to write the data in the sync back to your database without the databases connection closing and it going off home..
If your Moodle upgrade has been running for an amount of days, then there’s a under lying cause and no amount of increasing this is likely to help, although you could try increasing it to the max setting of 1073741824
Reason this is needed is taken from the manual below – Why this might Undo at any stage in the future is currently unknown, if you figure this out, let us know in the comments.
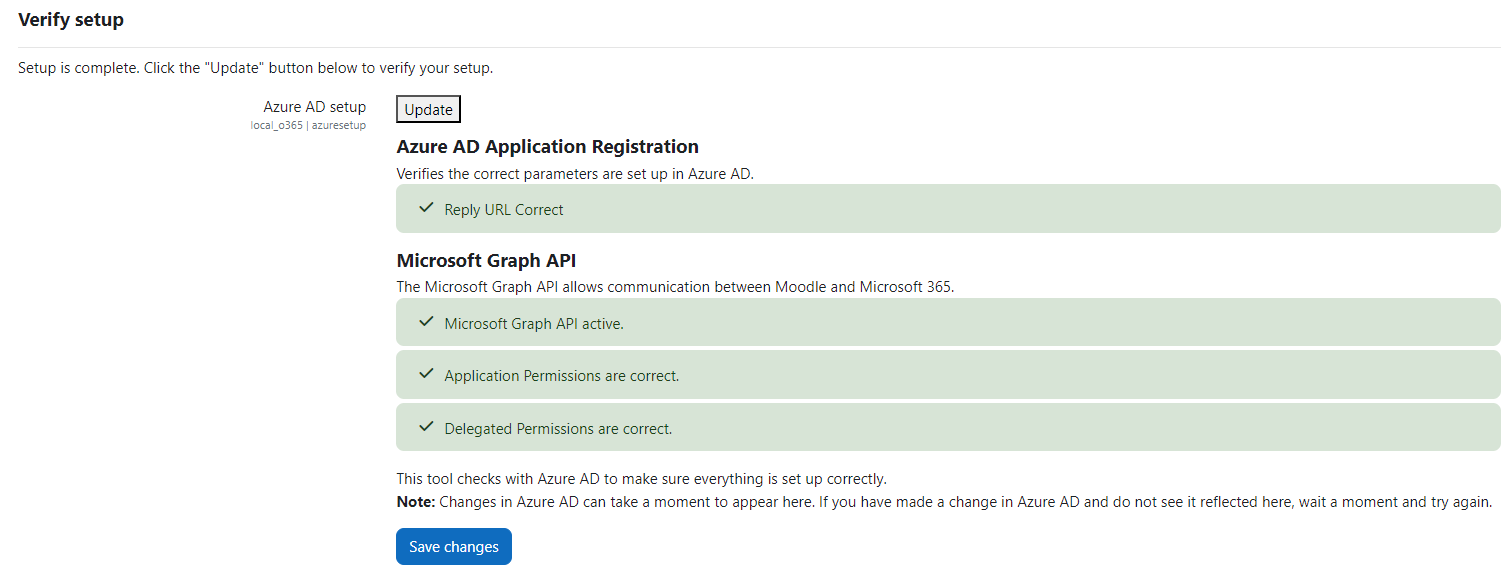
Verify Setup
This tool verifies that Azure has been correctly set up. Click the “Update” button to check setup.
If the tool reports any missing permissions, return to Azure and ensure that all required permissions have been added to your configured application for Moodle.
Press CTRL + A + D to exit the screen session and come back in a few days, either by checking the log file you piped it out to or the Session itself to see if it has finished.
To note www-data is the group which your Moodle is running its commands as