Category: Windows
Moodle OAuth 2 services > Microsoft OneDrive
Setting up OAuth 2 services within Moodle can be quite painful.
Hopefully the below information which is ‘not’ documented by Moodle will help you with that.
The issue I was seeing was when I clicked on ‘Connect to a system account’, it threw this error “The system account was not connected for offline access“

To fix this the answer lies within the endpoints on Moodle, the authorization_endpoint & token_endpoint needed the specific endpoints from the Azure App Registration

Within Azure these are here

Rather than the default ones which look like this, in the case for me /common/ was not working

If your issue is a different one and you are after support for your Moodle, why not reach out to us to host and or just support your instance.
Contact us here info@cosector.com
Moodle Scheduled Task & MySQL Going Away
Have you ever had the following error in one of your Moodle scheduled tasks ??

What this means is that and the size of the file it is trying to write is bigger than the variable currently allows, MySQL has tried to do as you’ve asked and couldn’t at which point it has packed its bags and gone home..
You might see it if you ever run a full Sync users with Azure AD on a large Moodle site.

The task will then just restart and fail the next time as well and keep looping causing your sync and Moodle site get more and more out of date with your Azure AD.
How to fix.. its pretty simple really, you just need to get MySQL’s connection to be able to write larger sized data files packages.
The default for max_allowed_packets on your Moodle’s MySQL database is likely to be 16mb
show global variables like '%max_allow%';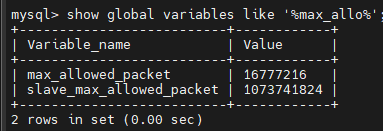
You want to change this to 256mb’s
You do this with the following line on your MySQL command line
set global max_allowed_packet = 268435456;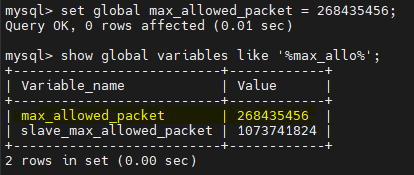
What is 268435456 ??
268435456 / 1024 / 1024 = 256 as in 256mbs, just like that 16777216 / 1024 / 1024 = 16 as in 16mbs.
This ‘should’ be enough to be able to write the data in the sync back to your database without the databases connection closing and it going off home..
😀
Moodle Office365 & redirect issues?
Having issue with your Moodle, specifically no longer being able to get to the manual login page when using either of these URL’s
https://yourMoodle/?noredirect=1
or
https://yourMoodle/login/index.php?noredirect=1
Do check that this is switched on
https://yourMoodle/admin/search.php?query=forceredirect

If you have lost access to your frontend in is in mdl_config_plugins

Check whether you Office365 plugins page is all verified, click the ![]() button, if yours is not in a state with green ticks as the below screenshot.
button, if yours is not in a state with green ticks as the below screenshot.
https://yourMoodle/admin/settings.php?section=local_o365
Reason this is needed is taken from the manual below – Why this might Undo at any stage in the future is currently unknown, if you figure this out, let us know in the comments.
Verify Setup
- This tool verifies that Azure has been correctly set up. Click the “Update” button to check setup.
- If the tool reports any missing permissions, return to Azure and ensure that all required permissions have been added to your configured application for Moodle.
Moodle Course Delete From the Command Line(CLI)
Have you a lot of courses to delete within Moodle & tried doing it via the frontend ?
Quickly you will learn that this is a complete nightmare and may work & most probably wont!
So how do you go about deleting from the CLI on the server?
Create your .csv file, use Excel or other application
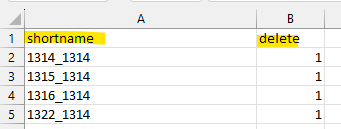
You only require a shortname and delete column
You can get the shortname like this from the database with this bit of SQL
Select shortname, '1' As 'delete' from mdl_course
Where shortname like '%1314%';
Export the output of this as a CSV and there is no need for Excel 😉
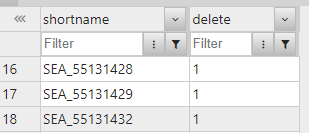
Now its time to jump on the server & head to
/var/www/moodle/docroot/admin/tool/uploaduser/cliCreate yourself a Screen session with something like
screen -S "RR #12345 1314 Course delete for XYZ"And run something like this .. check your directory paths, don’t just trust me !
sudo -u www-data php uploaduser.php --mode=update --updatemode=dataonly --file=/var/www/moodle/tmp/All-1314-CoursesFrom-mdl_course.csv --delimiter=comma --allowdeletes |tee /var/www/moodle/tmp/deletecourses-1314_log.txtPress CTRL + A + D to exit the screen session and come back in a few days, either by checking the log file you piped it out to or the Session itself to see if it has finished.
To note www-data is the group which your Moodle is running its commands as
Notepad++ Wrap numbers for ease of use in a SQL query
In my new role I seems to have lines and lines of numbers from scheduled tasks logs and the like, which I then have to action quickly back into SQL queries. So I thought I write down how I do that.. for two reason.
- You might stumble across it
- I may forget how to do it 😁
Launch Notepad ++
Press CTRL + H to bring up Replace
Find what:
^(.+)$
Replace with:
‘\1’,
Select Regular expression
Replace All
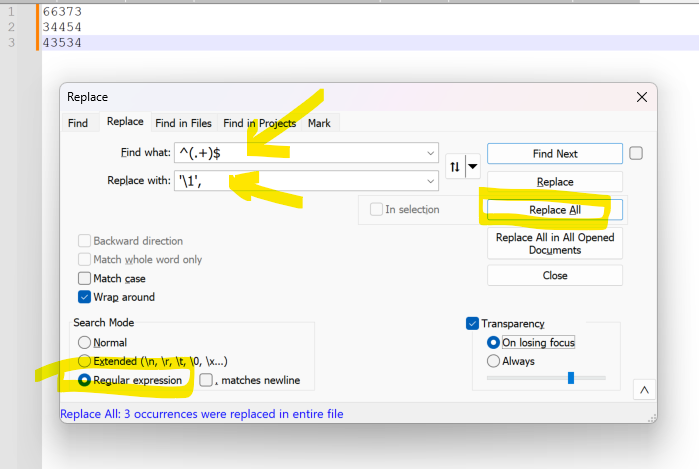
This coverts the above list of numbers into the following format

This way you can now wrap that in brackets and query it.
Moodle 4 Boost, Hide Block Titles
Good Morning, just thought I’d write a quick post about the blocks within the Boost theme in Moodle 4.
I’ve noticed that every block has the block’s name as a title. In our instance of Moodle 4 we do not want them as it duplicates what the content already displays.
So this is the CSS you need to pop into Boost / Advanced Settings /admin/settings.php?section=themesettingboost#theme_boost_advanced in the box ‘Raw SCSS theme_boost | scss’
/* Hide My Office365 block title */
.block_microsoft  .card-title {
    display: none!important;
}

/* Hide My Overview block title */
.block_myoverview .card-title {
    display: none!important;
}
In our case this does the following, the two blocks goes from this

To this

Hope that helps someone out there. I’m documenting this so I do not forget it when we go live to Moodle 4.1 in June 2023
Wider Moodle 4 Courses on a Desktop
The Course view on Moodle 4 looks very mobile like. If like me you’d prefer the course page to use all available space then do the following change it to the percentage that you think looks the best 90 or 100%
Site administration > Appearance > Themes > Boost > Advanced settings
/* Change course width to 90% of screen real estate */
$course-content-maxwidth: 90% !default;
Moodle Office365 plugin : User Principle Name is in the email field
Within the Microsoft Office365 suite of plugins
You’ve noticed that the UPN (User Principle Name) from Azure AD is represented within the email field within Moodle, even though all you have done is update the Office365 plugin suite set to the latest plugins.
What is going on there then?
If like us you have LTI which allow users access via their email address, then you will most likely find that these are now broken.
How to fix
Run the following SQL on the database
SELECT * FROM mdl_config_plugins WHERE plugin = 'local_o365' AND name = 'aadtenantid';
Does this return a blank entry ?
It should not be, it should return something which looks like this

You need to go here and get a Azure Administrator to login on the other side of the ‘Provide Admin Consent’ button : <a href=”http://<Your Moodle Site>/admin/settings.php?section=local_o365

This writes back the above required information so the sync can correct talk to Azure AD, rather than it only talking in a guest mode, in guest mode it can only get your UPN and not your email details.
Now perform a Full user sync by first going here : http://<Your Moodle Site>/local/o365/acp.php?mode=maintenance_cleandeltatoken This clears the delta tokens and forces the sync to do one full sync.
Then allow ‘Azure AD Sync’ in task scheduler to run, it will take a while to do so, it takes around 1.5hrs on our site.
Now check that username is UPN and email is email from Azure AD, although redacted the below gives you an idea that there is a difference.

Why has this happened? one of the updates has blanked out the settings in the database. I’ve asked the developers to consider adding whether the connection to the tenant is good by showing that in the Moodle frontend.
Clone a Moodle Theme 3.11 >
Time (again) has come around again for a major upgrade of Moodle 3.10 to 3.11, with this bring the fun of making sure the theme is working okay. Adaptable has just released their latest theme for Moodle 3.11, so I’ve taken this and cloned it. This makes it easier for us to know which theme works on which version of Moodle we have installed, rather than it to be just named Adaptable. In the past we’ve needed to flip the DNS to a new production server and without this it’s difficult to know which theme works.
Hopefully the below will work for you, it took me 3 attempts to crack it (this year), without having random php / file errors or SCSS (which this version has now started using) issues showing on the browser or in dev tools.
Step 1
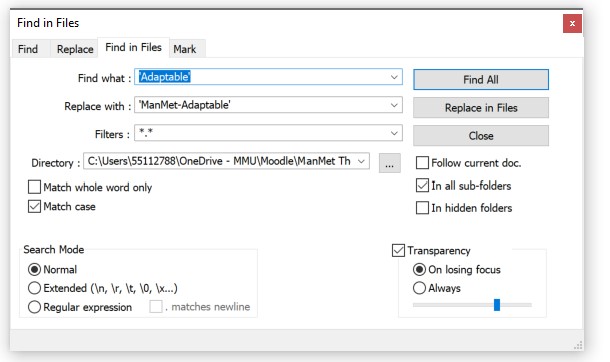
Download the latest version of your theme, we are using the 3.11 version of Adaptable here. In Notepad ++ use the ‘Find in Files’ function to locate everything ‘Adaptable‘ which is the current name of the theme, replace that with your new name ‘ManMet-Adaptable‘. This should be two hits in one file, then hit ‘Replace in Files’. This just changes the naming in the language pack
Step 2
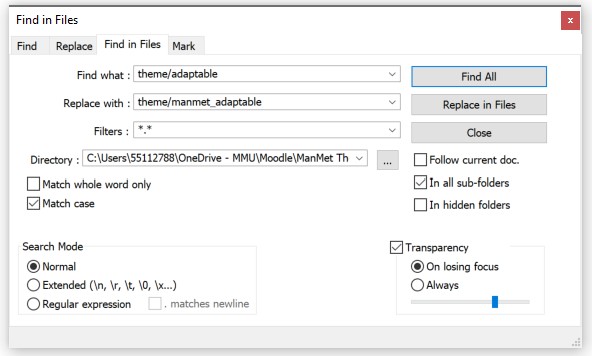
Now search for ‘theme/adaptable‘ and replace all with ‘theme/manmet_adaptable‘ (dont use a minus symbol in the theme path). This should find 24 hits in 8 files, now replace all with ‘Replace in Files’.
Step 3
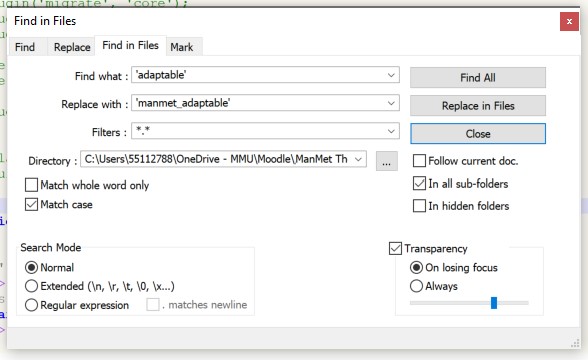
Search for the original name of the theme ‘adaptable‘, change this to ‘manmet_adaptable‘.
Step 4
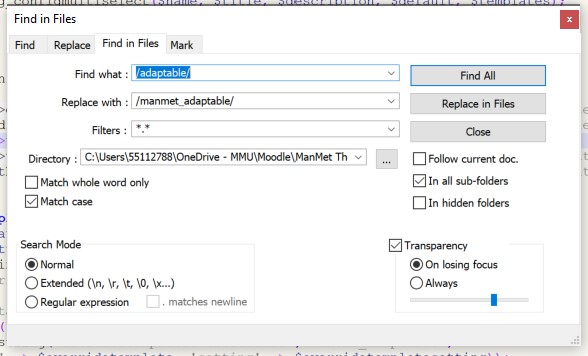
Now search the theme code for ‘/adaptable/‘ and replace with ‘/manmet_adaptable/‘.
Step 5
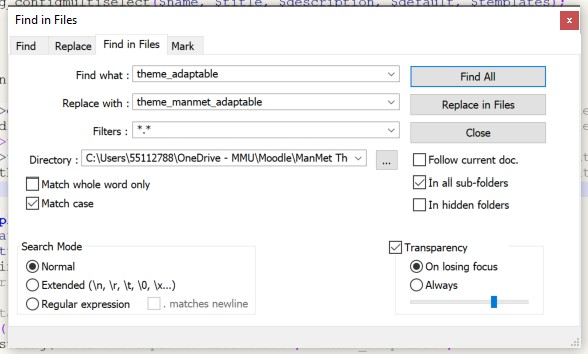
Now find ‘theme_adaptable‘ and change that to ‘theme_yourname‘, in my case this is ‘theme_manmet_adaptable‘.
Step 6
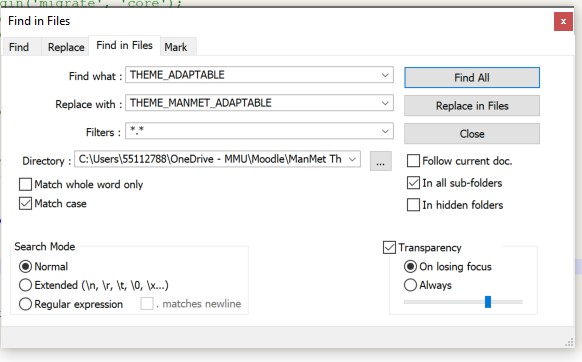
The unknown step.. I think it is required 🙂 I think it’s to do with the tabs in the theme settings. Search for ‘THEME_ADAPTABLE‘ and replace with ‘THEME_MANMET_ADAPTABLE‘, this should return around 18 hits in 7 files.
Step 7 – Change the name of the Language file
Rename ‘manmet_adaptable\lang\en\theme_adaptable.php’ to ‘theme_manmet_adaptable.php’
And any subsequent language packs in \es etc folders.
Step 8 –
Check places like config.php in the root of your theme and add any extra theme .css or .scss file which you might have in the \styles dir. Also check that the naming in \jquery\plugins.php file matches the name of the .js file in \jquery it should be under
$plugins = array(
    'manmet_adaptable' => array('files' => array('adaptable_v2_1_1_2.js')),
Step 9 – Change Theme CSS name
Rename the main SCSS file from ‘\scss\settings\adaptable.scss’ to ‘\scss\settings\manmet_adaptable.cssc’.
Step 10 – Zip deploy and test
Change the name of the theme folder to match, in my case ‘manmet_adaptable‘, zip it up and deploy for testing. Bitnami Moodle local installs are idea to do this
Good luck ! should the above method not work for you, do try the one which was working for Moodle 3.10 themes or the one which was working for Moodle 3.9 themes which I wrote in 2018.
Powershell : Cross reference IDs / UPNs with Azure Active Directory
Recently I needed to check that Moodle was suspending the correct users when allowing full control over accounts to the brilliant bit of Microsoft code plugins suite Office365 integration
As of the October 2021 release it still does odd things when running for the first time with the following setting switched on, if you use Transitive / Nested AD security group to control the access

So I wrote this piece of Powershell script to check each of the returned suspended IDs with whether those were still active in AAD or not.
#Connect-AzureAD
#Set-ExecutionPolicy -ExecutionPolicy RemoteSigned
#C:\ad-test\aad-crossreference.ps1 | Out-File C:\AD-Test\results.txt -width 132

$list = import-csv "c:\AD-Test\Moodle-Azure-AD-sync-run-231221.csv"

$i = 0
foreach($item in $list){

try
	{
	Get-AzureADUser -ObjectId $item.upn | select userprincipalname,accountenabled
	$i++
	} catch

		{
		#Write-Host $_.Exception.Message
		Write-Host -ForegroundColor Yellow $item.upn "not found"
		}
}

Write-Host "Found $i accounts"
The top 3 lines are commented out, they are just should you need them then run them separately at the powershell command prompt. The top two are required to use the script and the 3rd is the line I use to run the script itself, which is saved as aad-crossreference.ps1 and it outputs the result to a file ‘results.txt’.
In the file to check, make sure it starts with a column name of ‘upn’, like so

Hope this helps you out if you ever need to do something similar.