Category: Windows
Mailto subject / body in Android email client broken?
The following section of mailto: code wasn’t working on the default Android email client and Gmail client.
<div class="panel-body"> Please contact the <a href="mailto:it.helpline@random.com?Subject=No%20Tiles%20within%20Application&Body=Please%20could%20you%20check%20my%20account%20@(Model.LoggedInUser.Id)%0D%0A%0D%0AMany%20Thanks" target="_top">IT Helpline</a></div>
The reason is down to a simple issue ?Subject and &Body both started with capital letters, replace these to be lowercase ?subject and &body and the following code works across all clients on all platforms.
<div class="panel-body"> Please contact the <a href="mailto:it.helpline@random.com?subject=No%20Tiles%20within%20Application&body=Please%20could%20you%20check%20my%20account%20@(Model.LoggedInUser.Id)%0D%0A%0D%0AMany%20Thanks" target="_top">IT Helpline</a></div>
I’ve tested on :
Android : Default mail, Gmail, Nine
iOS : Safari, Gmail
Windows : Outlook, Gmail
Achieve ‘A’ rating on SSLABS server test using IIS 8.5 Windows 2012 R2
Do you want to reach the heights of having an A graded server on SSLABS server tests?
First thing you need to do on a fresh install of Windows server 2012 R2 and IIS 8.5 is disable SSL3 functionality, this can be achieved by following this guide. Come back here once you have done this. Or if you trust me here’s my exported regedit key, which you can just import to your server.
Below is the Cipher Key string that I put into the Local Group Policy Editor. To do so click the Windows icon and type in gpedit.msc and press enter to launch the Policy Editor. Open on the left the folder titled ‘Administrative Templates‘ / ‘Network’ / ‘SSL Configuration Settings’ & double click on ‘SSL Cipher Suite Order‘ to open. Now Enable the SSL Cipher Suites and copy and paste the below list in. Click OK and restart your server, now run the SSL server test again to see the result.
TLS_ECDHE_RSA_WITH_AES_256_CBC_SHA384_P256,
TLS_ECDHE_RSA_WITH_AES_256_CBC_SHA384_P384,
TLS_ECDHE_RSA_WITH_AES_128_CBC_SHA256_P256,
TLS_ECDHE_RSA_WITH_AES_128_CBC_SHA256_P384,
TLS_ECDHE_RSA_WITH_AES_256_CBC_SHA_P256,
TLS_ECDHE_RSA_WITH_AES_256_CBC_SHA_P384,
TLS_ECDHE_RSA_WITH_AES_128_CBC_SHA_P256,
TLS_ECDHE_RSA_WITH_AES_128_CBC_SHA_P384,
TLS_RSA_WITH_AES_256_GCM_SHA384,
TLS_RSA_WITH_AES_128_GCM_SHA256,
TLS_RSA_WITH_AES_256_CBC_SHA256,
TLS_RSA_WITH_AES_128_CBC_SHA256,
TLS_RSA_WITH_AES_256_CBC_SHA,
TLS_RSA_WITH_AES_128_CBC_SHA,
TLS_ECDHE_ECDSA_WITH_AES_256_GCM_SHA384_P384,
TLS_ECDHE_ECDSA_WITH_AES_128_GCM_SHA256_P256,
TLS_ECDHE_ECDSA_WITH_AES_128_GCM_SHA256_P384,
TLS_ECDHE_ECDSA_WITH_AES_256_CBC_SHA384_P384,
TLS_ECDHE_ECDSA_WITH_AES_128_CBC_SHA256_P256,
TLS_ECDHE_ECDSA_WITH_AES_128_CBC_SHA256_P384,
TLS_ECDHE_ECDSA_WITH_AES_256_CBC_SHA_P256,
TLS_ECDHE_ECDSA_WITH_AES_256_CBC_SHA_P384,
TLS_ECDHE_ECDSA_WITH_AES_128_CBC_SHA_P256,
TLS_ECDHE_ECDSA_WITH_AES_128_CBC_SHA_P384,
TLS_DHE_DSS_WITH_AES_256_CBC_SHA256
Cipher suite from above all on one line for copying into GPEDIT.MSC
TLS_ECDHE_RSA_WITH_AES_256_CBC_SHA384_P256,TLS_ECDHE_RSA_WITH_AES_256_CBC_SHA384_P384,TLS_ECDHE_RSA_WITH_AES_128_CBC_SHA256_P256,TLS_ECDHE_RSA_WITH_AES_128_CBC_SHA256_P384,TLS_ECDHE_RSA_WITH_AES_256_CBC_SHA_P256,TLS_ECDHE_RSA_WITH_AES_256_CBC_SHA_P384,TLS_ECDHE_RSA_WITH_AES_128_CBC_SHA_P256,TLS_ECDHE_RSA_WITH_AES_128_CBC_SHA_P384,TLS_RSA_WITH_AES_256_GCM_SHA384,TLS_RSA_WITH_AES_128_GCM_SHA256,TLS_RSA_WITH_AES_256_CBC_SHA256,TLS_RSA_WITH_AES_128_CBC_SHA256,TLS_RSA_WITH_AES_256_CBC_SHA,TLS_RSA_WITH_AES_128_CBC_SHA,TLS_ECDHE_ECDSA_WITH_AES_256_GCM_SHA384_P384,TLS_ECDHE_ECDSA_WITH_AES_128_GCM_SHA256_P256,TLS_ECDHE_ECDSA_WITH_AES_128_GCM_SHA256_P384,TLS_ECDHE_ECDSA_WITH_AES_256_CBC_SHA384_P384,TLS_ECDHE_ECDSA_WITH_AES_128_CBC_SHA256_P256,TLS_ECDHE_ECDSA_WITH_AES_128_CBC_SHA256_P384,TLS_ECDHE_ECDSA_WITH_AES_256_CBC_SHA_P256,TLS_ECDHE_ECDSA_WITH_AES_256_CBC_SHA_P384,TLS_ECDHE_ECDSA_WITH_AES_128_CBC_SHA_P256,TLS_ECDHE_ECDSA_WITH_AES_128_CBC_SHA_P384,TLS_DHE_DSS_WITH_AES_256_CBC_SHA256
The following 2 Cipher’s currently only work on Windows server 2016 & IIS 10
TLS_ECDHE_RSA_WITH_AES_128_GCM_SHA256,
TLS_ECDHE_RSA_WITH_AES_256_GCM_SHA384
*Note: I’ve included ‘TLS_ECDHE_RSA_WITH_AES_128_GCM_SHA256‘ & ‘TLS_ECDHE_RSA_WITH_AES_256_GCM_SHA384‘ in a separate code block below the main cipher keys, although these do not currently work on Windows 2012 with IIS 8.5 – I’m hoping that a patch with come through from Microsoft soon which enables them, as these will take the ‘A’ to an ‘A+’ rating, as they do when using Windows Server 2016 IIS 10.
So if you are using IIS 10 on Windows Server 2016 then add these to the top and removed the bottom two as all keys will not fit within the cipher field.
Chrome updates disabled by Administrator?
You might run into this issue in a large corporation, where an overzealous Administrator thinks that they know better than Google and therefore try and stop your machine from staying up to date with the latest Google release.
Please note to edit your Registry you need to be a Local Administrator.
To ‘fix’ this issue, it might need to done using a batch script as your policies might get reset on each login or at a set time.
Run the Registry Editor, Start/Run: regedit
Browse to: HKEY_LOCAL_MACHINE\SOFTWARE\Policies\Google\Update
Double-click at the UpdateDefault or DefaultUpdate (depends on what version installed)
Change the 0 to a 1
Exit Registry Editor and return to the Help/About Google Chrome section, your browser will then start to auto update!
Port opened? Telnet is your friend
Do you want to know if the problem you are having is a network \ firewall issue?
You can simply use Telnet to check if the port you are trying to connect to is open or not.
You can test any port using this simple method, not just connections open to telnet.
First off you need to install Telnet Client on your machine.
To do so, open a command prompt window. Click Start, type cmd in the Start Search box, and then press ENTER.
pkgmgr /iu:"TelnetClient"
Next step close the current command prompt and reopen it again, this is so the path to Telnet which you’ve just installed will work.
Now type the connection & port to test
telnet <server> <port>
Example
telnet google.co.uk 80
If it goes to a blank screen or a screen with funny characters then this means that port is open.
If you get :
Connecting To google.co.uk..Could not open connection to the host, on port 80:Connect failed
Then you’ll need to get onto your network team to open some firewall rules for the required port access or iptables if on unix servers.
Cisco VPN Windows 10
There’s lot of information out there on how to get Cisco VPN to connect to your work computer using Windows 10, but only one site I’ve found actually gives information that works:
5 Steps to make Cisco VPN work in Windows 10
I’ve summed this up below as it contains too much information, this is what worked for me, I was getting:
“Error 433 Secure VPN Connection terminated locally by the Client. Reason 433: Reason not specified by peer.”

The likely reason is due to the DNE LightWeight Filter network client not being properly installed by the Cisco Systems VPN installer.
To solve this, please try to do the following
A) First, uninstall any Cisco VPN Client software you may have installed earlier
B) Reboot your computer.
C) Run winfix.exe, to ensure the DNE is properly cleaned up, as no doubt this isn’t your first attempt.
D) Reboot your computer again.
E) Download Sonic VPN software from here: 32-bit or 64-bit
F) Install the Sonic VPN software from above.
G) Reboot your computer.
H) Reinstall the Cisco VPN Client software again. (If you face a version not suitable for Windows 10 issue, run the msi file instead of the exe file)
I) Install the Cisco VPN Client Software: 32-bit Windows VPN Client (version 5.0.07) or 64-bit Windows VPN Client (version 5.0.07)
J)Reboot.
K)Make changes to the registry:
Open Registry editor regedit in Run prompt
Browse to the Registry Key HKEY_LOCAL_MACHINE\SYSTEM\CurrentControlSet\Services\CVirtA
Select the Display Name to modify, and remove the leading characters from the value data value as shown below,
For x86 machine, shorten the string “@oem8.inf,%CVirtA_Desc%;Cisco Systems VPN Adapter” to just “Cisco Systems VPN Adapter”
Or for x64 machine, shorten the string”@oem8.inf,%CVirtA_Desc%;Cisco Systems VPN Adapter for 64-bit Windows” to just “Cisco Systems VPN Adapter for 64-bit Windows”
L) Reboot your computer.
M) Your Cisco VPN Client should now work in Windows 10
Are you getting a 412 error?

I was getting this when I was trying to connect from within my organisation, this isn’t allowed as your organisation is blocking the required UDP ports 4500/500
Solution, try connecting from somewhere external to your organisation.
If this doesn’t work for you then you’ll have to delve into the full site to work it out for your set-up.
Windows 10 Update Uninstalls “Cisco Systems VPN Adapter”
I noticed that a recent Windows 10 update kindly uninstalled my Cisco VPN Adapter! Why? I’m not sure. Apparently ‘removed due to incompatibility issues’ But if you want it back, you’ll need to uninstall ‘Cisco Systems VPN Client 5.0.07.0440‘ in Add or Remove programs then re-run the msi installer, this will FAIL, now jump to the unzipped directory ‘C:\Users\\AppData\Local\Temp‘ to find ‘vpnclient_setup.msi‘, run this, you might need to run it twice as it complains about failing to add itself to the Services. Then you need to re-edit the ‘Display Name‘ using the Registry key in Regedit, as above.
jQuery Highlight Table Row ID
Covering a couple of issues which I encountered.
- How to Highlight a row in a Table on click using jQuery
- How to Only use the above code on that Table
Code:
$(document).ready(function() {

$("table#SearchResultsTable").on('click', 'tr', function () {

var state = $(this).hasClass('highlighted');

$('.highlighted').removeClass('highlighted');

if (!state) {

$(this).addClass('highlighted');

}

});

});
Code to use just your desired Table:
$("table#SearchResultsTable")
Hope the above helps you on your travels.
Simple JQuery Onclick within Visual Studio
I wanted to perform what I thought would be a simple task..
Select a Radio button and make this perform its task without submitting the form with an extra click on a button.
After much searching and trial and error I found that this task can be done with a simple extension to the radio button:
onClick = "$(this).closest('form').submit();"
Here it is in context:
@Html.Label("Student")
@Html.RadioButtonFor(model => model.RequiredFilter, "Student", new { @class = "radioAlignLeft", onClick = "$(this).closest('form').submit();" })
Hope it helps, if I had found this blog post it would have helped me!
How to do a Mail Merge – With more than one record per page
*** UPDATE 2021 *** The below has helped a lot of people out over the years since it was written in 2013. I’ve recently had a much more advanced email merge to contend with, so inserting the link to that post here.
Advanced Mail Merge : Multiple clickable URL entries per mail to user
I opted to learn how to use the mail merge features of MS Word linked to Excel, as each year my wife goes on about the hassles that she gets whilst trying to mail 4000 people & how difficult it is to get it right.
So this is what I learnt as I cracked the issues that she couldn’t, so this time next year her job will be that much easier.
I thought I’d add it as a blog post for two reasons, first to help you and second to remind me how to do it.
The first thing you need to do a mail merge is some data in Excel, I made up the following:
![]()
Next launch Word and write a letter.
Next click the Mailings tab, Start Mail Merge drop down and select Step by Step Mail Merge Wizard
Now for the fun bit, work your way through the wizard, select an your Excel file to use & add to the existing letter an Address Block from the left menu, this will add in the address for each person, then choose a Greeting Line both of these two options reduces the amount of work that you have to put into your letter and personalises it to the max.

Now to cover one of problems my wife was having, she wanted to being able to have 3 letters printed to 1 page, thus saving on paper. if you just copy and paste the text 3 times on the one Word document then this doesn’t work, it’ll just repeat the same persons name and address 3 times.
The way you get around this is by requesting the next record, do this by marking the start of the next block with «Next Record»
before the request for «AddressBlock», so you’ll have your next record starting with:
«Next Record»«AddressBlock»
Time format, by default you’ll get all sorts of weird time formats. To change what time format gets displayed you need to editing the field code with Edit Field… this is available by selecting it on a right click on the current field, in this case on the merge field marked «Time» Then Field Codes button and add the following to get just the hours without any seconds.
MERGEFIELD Time \@ "HH:mm"
The above information mixed with a little bit of trial and error with make you a master at the Mail Merge functionality of MS Office.
Top Tip: If at any point you feel that the Mail Merge Wizard is not doing what you ask it to do, then it most probably isn’t. Its a complete wind up and learning how to do a mail merge by using the menu bar tools is the best advice I can give.
Second Top Tip: If at any point you want to remove the mail merge information from the word document, do so by opening the document, click on the Mailings tab, click the down arrow under the Start Mail Merge button, click on Normal Word Document. This will disconnect the Word document from the source document.
If you get a date out as 1899 then read this to explain all and fix the issue
Image below shows how I manage to get multiple postcards on one page, each postcard reads a separate record:
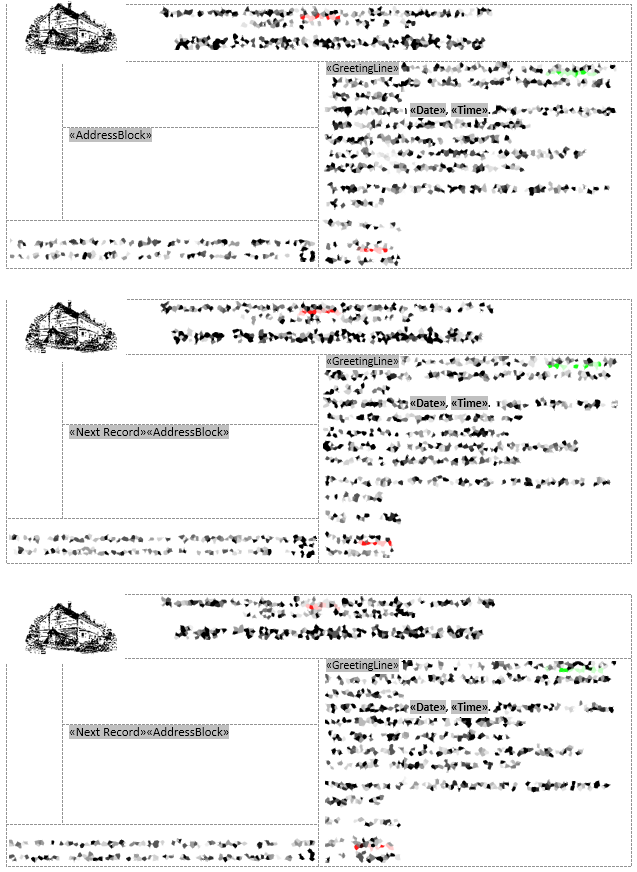 Click image to enlarge, it’ll show that I have «AddressBlock» , «GreetingLine» , «Date» , «Time» inserted into the merge, each postcard is in a Text box, with smaller text boxes inside. This then keeps each merge record together, so when a «NextRecord» is called it knows where to put the details without missing any information. Like the issue that Karen is having below, if you read the comments.
